In this process we will configure an HIDS Agent, installed on a Linux system with Suricata appliance, to read logs from a file. This can be useful when we try to grab data from an application that logs directly into a file.
Configure HIDS Agent to read a file on Suricata host
- Edit /var/ossec/etc/ossec.conf
- Add the following settings inside the element of the ossec.conf file:
<localfile> <log_format>syslog</log_format> <location>/var/log/suricata/fast.log</location> </localfile> - Restart the ossec-agent service.
Enable “logall” on USM Appliance
- In the USM Appliance web UI, go to Environment -> Detection -> HIDS -> Config -> Configuration.
- Add <logall>yes</logall> to the <global> section of the file:
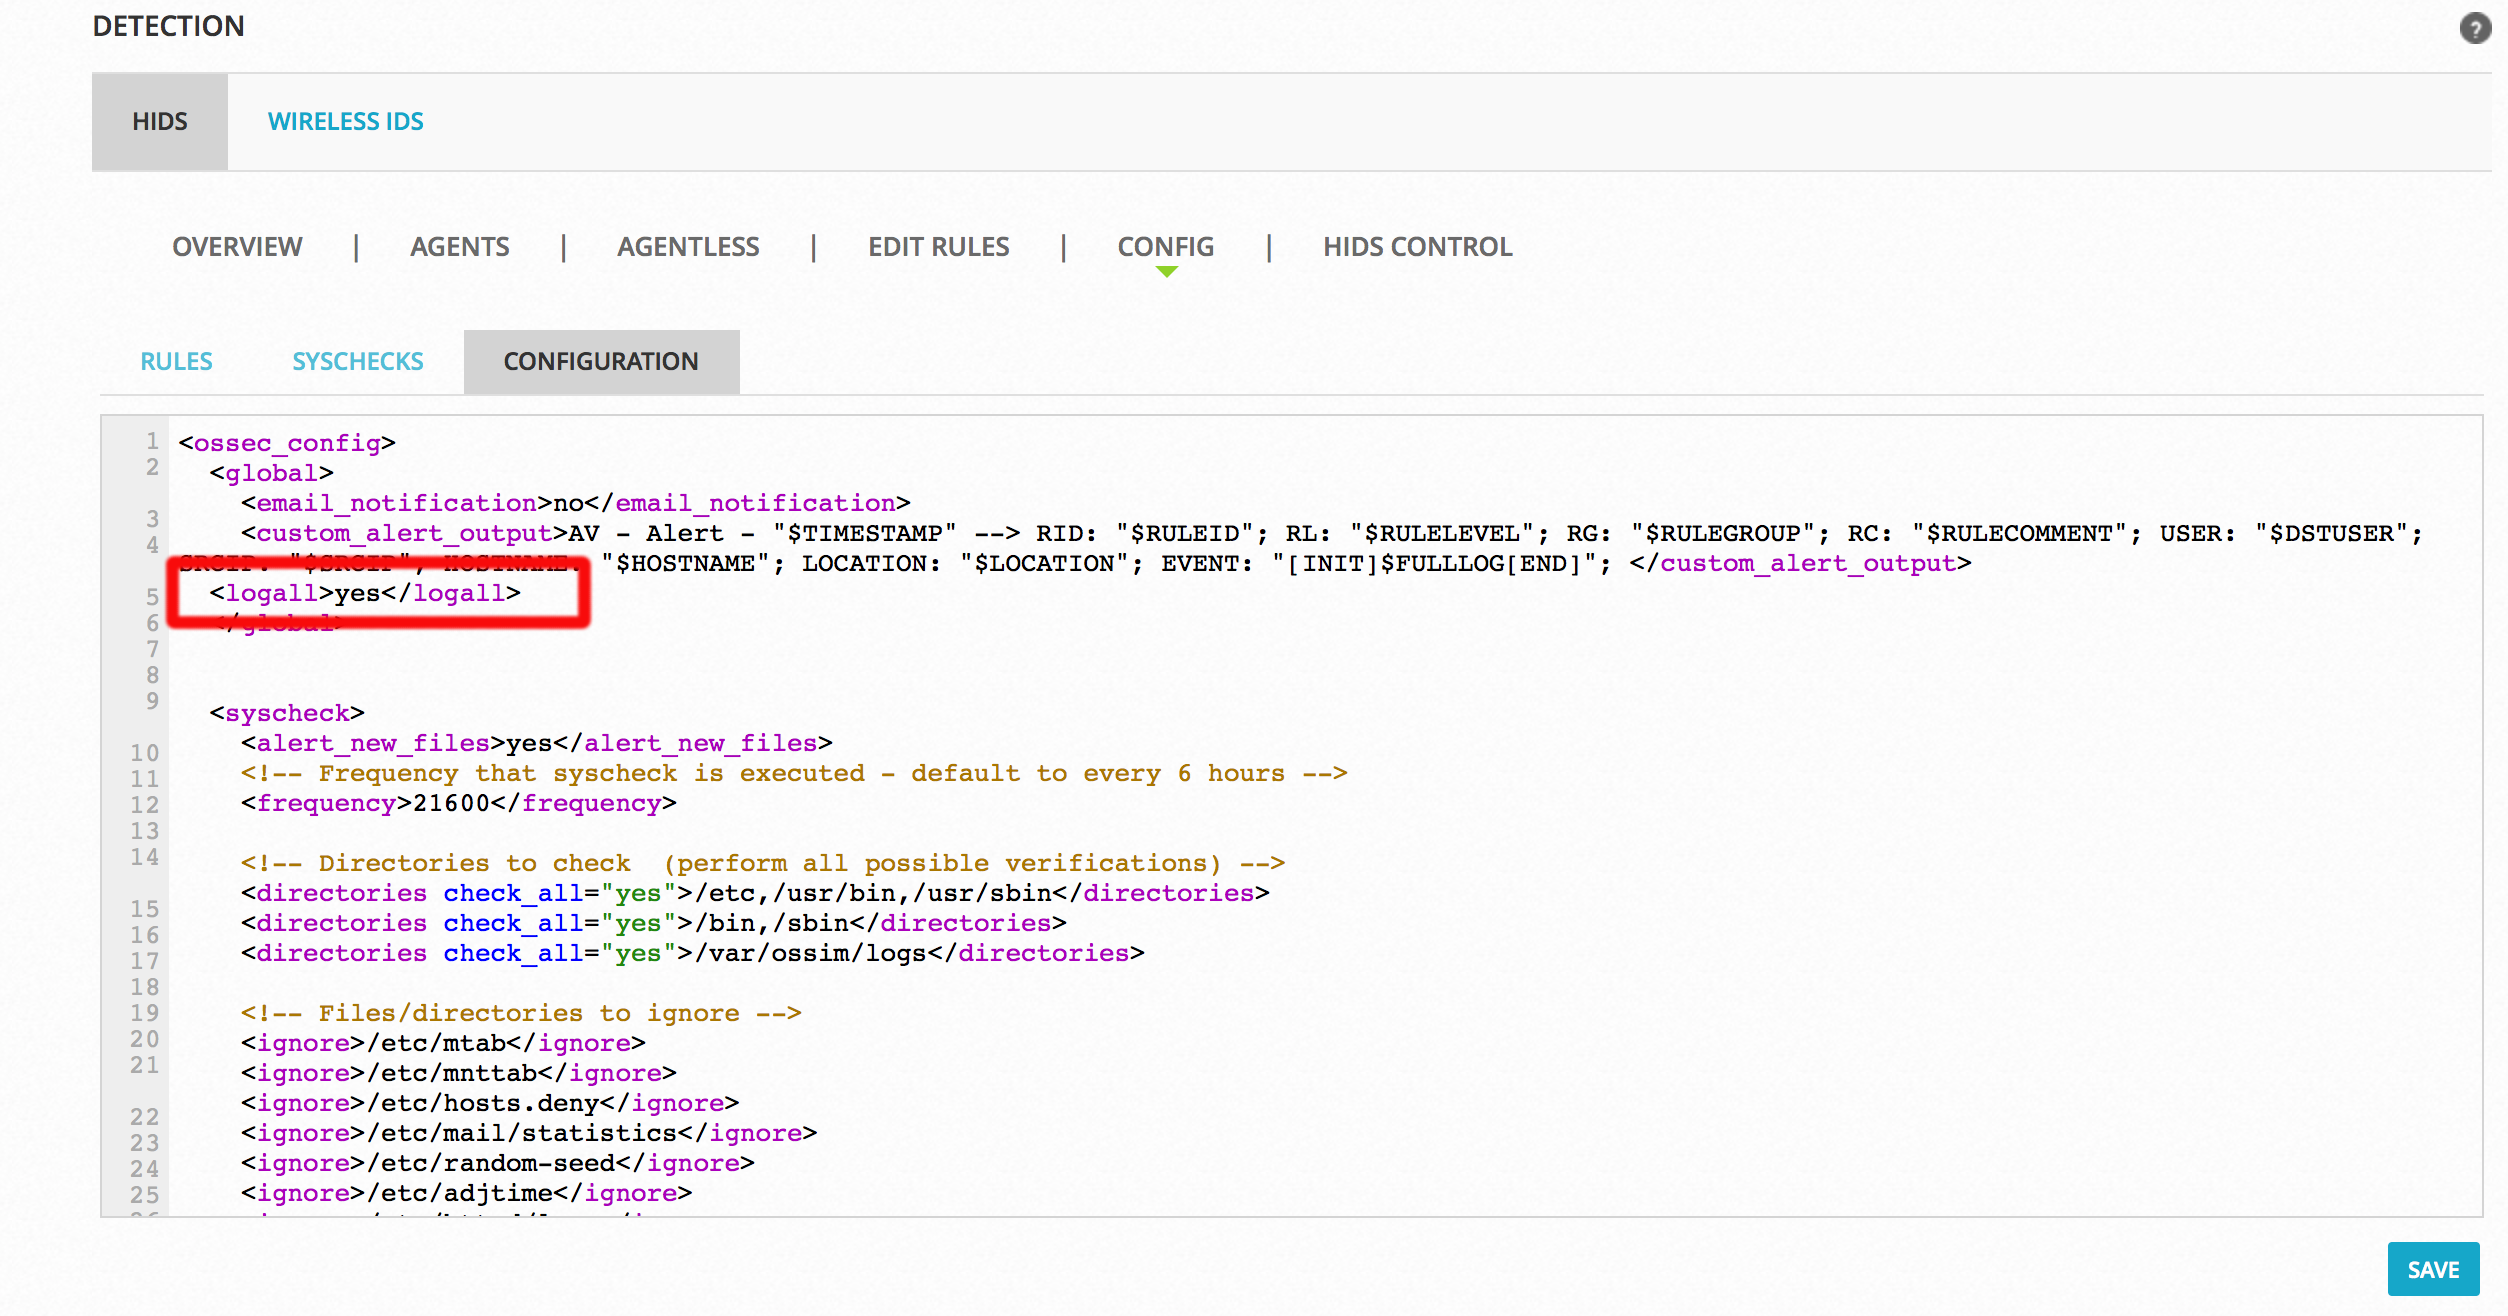
Adding this setting allows logging of all events to /var/ossec/logs/archives/archives.log. - Click Save at the bottom of the screen.
- Restart the HIDS Service:
- Go to Environment -> Detection -> HIDS -> HIDS Control.
- Click Restart.
Confirm that USM Appliance receives the log line
- Run surricata on the host /usr/bin/suricata -c /etc/suricata//suricata.yaml -i eth1 -D
- On USM Appliance, check for the newly added line in
/var/ossec/logs/archives/archives.log
You can check for log line by running the following command:grep suricata /var/ossec/logs/archives/archives.log
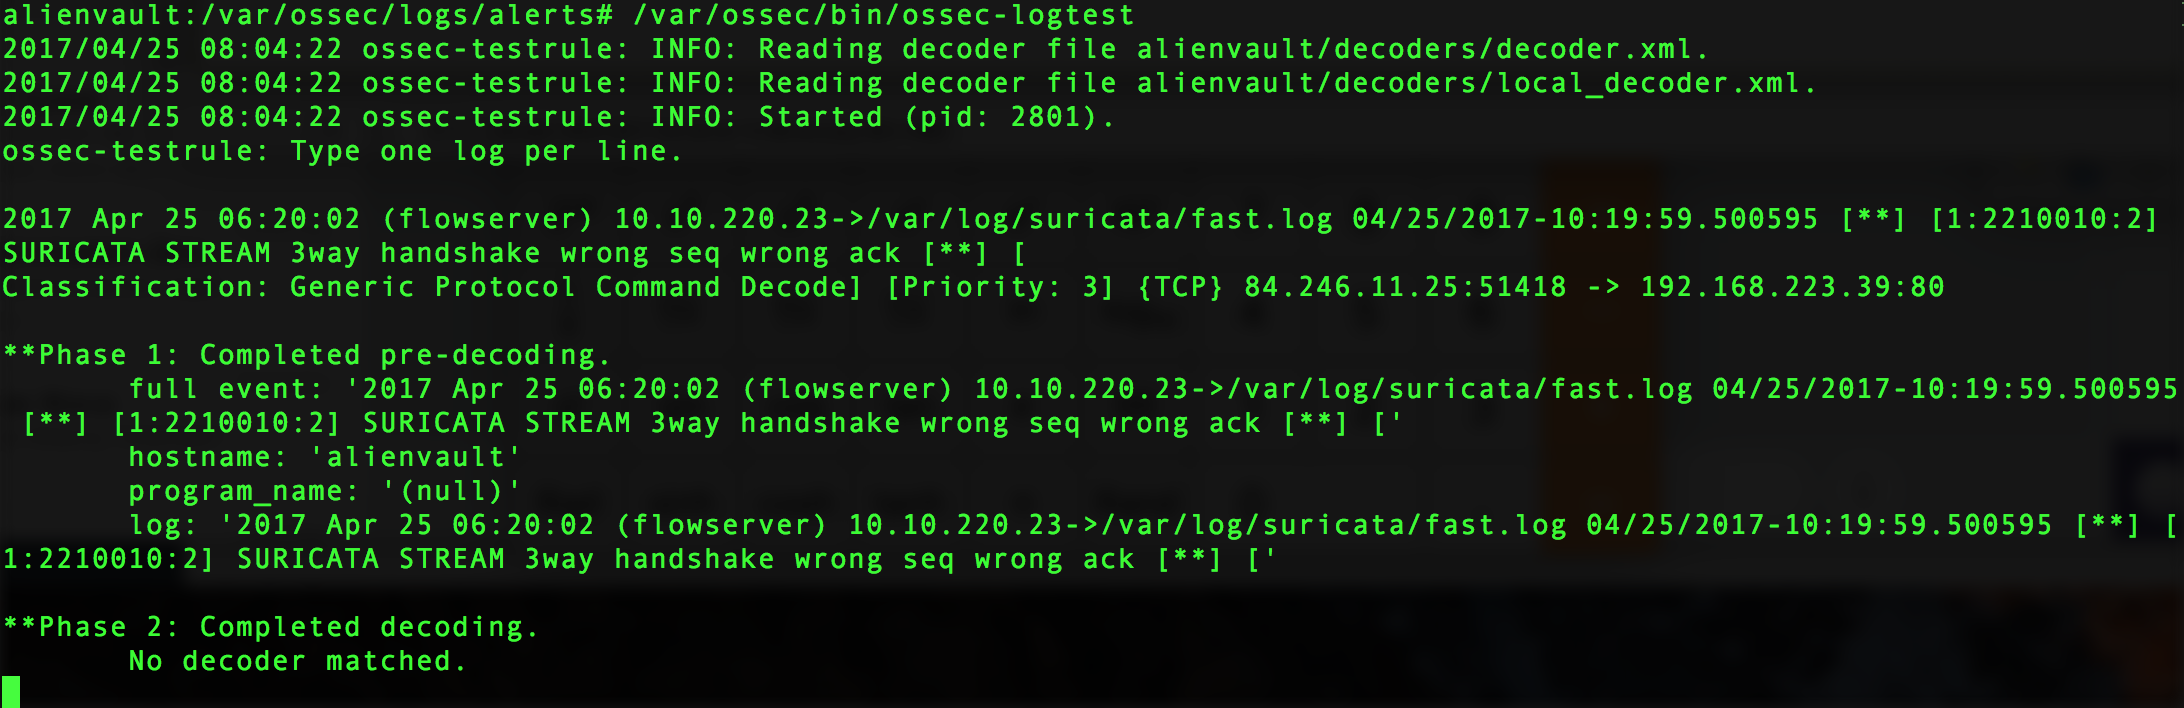
You should see an output similar to the following:
2017 Apr 25 06:20:02 (flowserver) 10.10.220.23->/var/log/suricata/fast.log 04/25/2017-10:19:59.499998  [**] [1:2210000:2] SURICATA STREAM 3way handshake with ack in wrong dir [**]
 [Classification: Generic Protocol Command Decode] [Priority: 3] {TCP} 192.168.226.84:993 -> 83.110.234.147:62099
2017 Apr 25 06:20:02 (flowserver) 10.10.220.23->/var/log/suricata/fast.log 04/25/2017-10:19:59.500595  [**] [1:2210010:2] SURICATA STREAM 3way handshake wrong seq wrong ack [**] [
Classification: Generic Protocol Command Decode] [Priority: 3] {TCP} 84.246.11.25:51418 -> 192.168.223.39:80
Create a new decoder on USM Appliance to parse the incoming log lines
- On USM Appliance edit /var/ossec/alienvault/decoders/local_decoder.xml(same as decoder.xml but this one is not overwritten when updating the system).If this file does not exist you can create it with the following command:
touch /var/ossec/alienvault/decoders/local_decoder.xml
- In local_decoder.xml add a new decoder to parse first part of the log message and save your changes:
<decoder name="suricata">
<prematch>^suricata</prematch>
</decoder>
- In the USM Appliance web UI, go to Environment -> Detection -> HIDS -> Config -> Configuration.
- Add <decoder>alienvault/decoders/local_decoder.xml</decoder> right after <decoder>:
 Adding this setting enables the usage of a custom decoder.
 - Click Save at the bottom of the screen.
- Restart the HIDS service
- Go to Environment -> Detection -> HIDS -> HIDS Control.
- Click Restart.
- Run /var/ossec/bin/ossec-logtest and paste the log line “2017 Apr 25 06:20:02 (flowserver) 10.10.220.23->/var/log/suricata/fast.log 04/25/2017-10:19:59.500595 [**] [1:2210010:2] SURICATA STREAM 3way handshake wrong seq wrong ack [**] [
Classification: Generic Protocol Command Decode] [Priority: 3] {TCP} 84.246.11.25:51418 -> 192.168.223.39:80” - Check if it recognizes the decoder.
If it works you will see the newly created decoder listed, as shown below:
Create a new rule on USM Appliance to parse lines processed by the decoder
- On USM Appliance edit /var/ossec/alienvault/rules/local_rules.xml.
- Add the following lines to the file:
<group name="suricata">
<rule id="106000" level="0">
<decoded_as>suricata</decoded_as>
<description>suricata is enabled</description>
</rule>

<rule id="106001" level="1">
<if_sid>106000</if_sid>
<match>suricata</match>
<description>suricata string found</description>
</rule>
</group>
- Restart the HIDS service
- Go to Environment -> Detection -> HIDS -> HIDS Control.
- Click Restart.
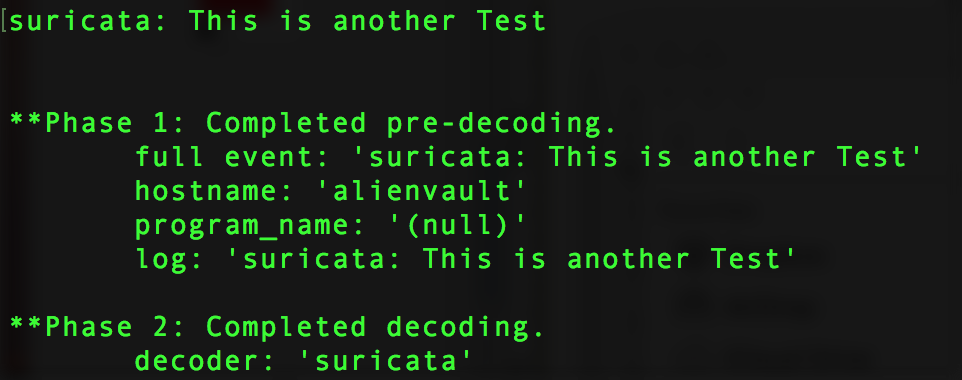
- Run /var/ossec/bin/ossec-logtest and paste a log line (in this case “suricata: This is another Test“).
- Check if it recognizes the decoder.
If it works you will see the newly created decoder listed, as shown below:
Create a new rule on USM Appliance to parse lines processed by the decoder
- On USM Appliance edit /var/ossec/alienvault/rules/local_rules.xml.
- Add the following lines to the file:
<group name="suricata">
<rule id="106000" level="0">
<decoded_as>suricata</decoded_as>
<description>suricata is enabled</description>
</rule>

<rule id="106001" level="1">
<if_sid>106000</if_sid>
<match>suricata</match>
<description>suricata string found</description>
</rule>
</group>
- Restart the HIDS service
- Go to Environment -> Detection -> HIDS -> HIDS Control.
- Click Restart.
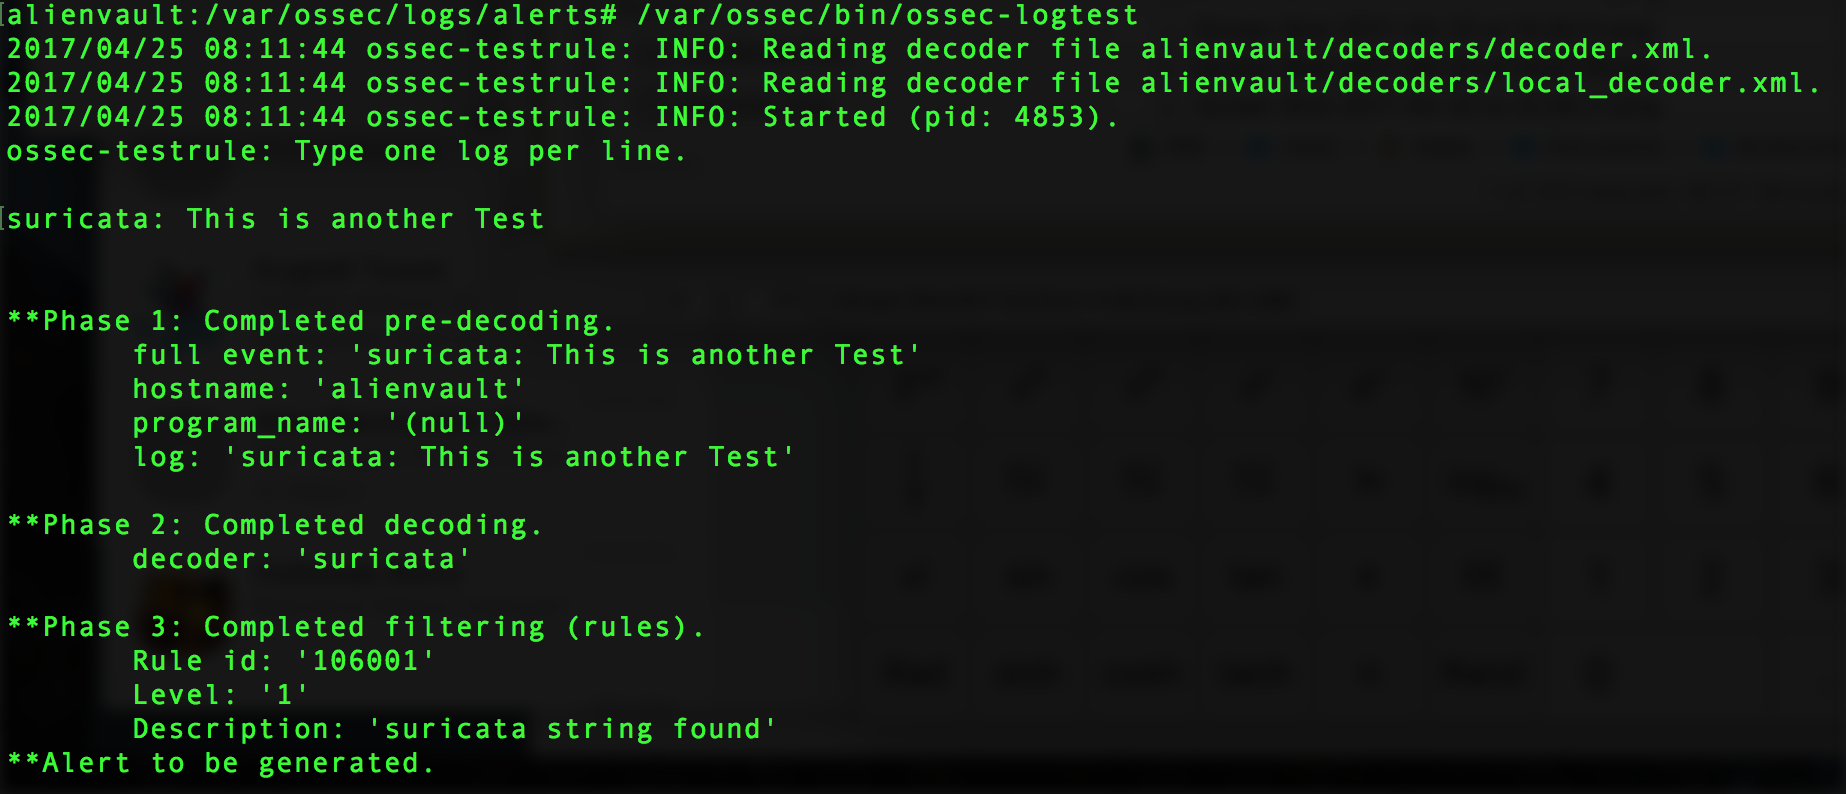
- Run /var/ossec/bin/ossec-logtest and paste a log line (in this case “suricata: This is another Test“”).
- Check if it recognizes the rule:
You will see Phase 3 of the Log Test has completed and matched our new rule:
Create and configure local version of the ossec-single-line plugin
- Create a .local version of the ossec-single-line plugin (if it does not already exist) and ensure it has the correct owner, group and permissions:
touch /etc/ossim/agent/plugins/ossec-single-line.cfg.local
chown root:alienvault /etc/ossim/agent/plugins/ossec-single-line.cfg.local
chmod 644 /etc/ossim/agent/plugins/ossec-single-line.cfg.local
- Insert or add the following translation to the ossec-single-line.cfg.local file:
[translation]
106001=7999
- Insert a new plugin_sid with value “106001” for the ossec-single-line plugin. This can be done using the following command:
echo 'INSERT IGNORE INTO plugin_sid(plugin_id, sid, category_id, class_id, reliability, priority, name) VALUES(7999, 106001, NULL, NULL, 1, 2, "ossec: my_application_test_rulematch");' | ossim-db
- Run the command below to ensure the new configuration takes effect :
alienvault-reconfig
Test your configuration
- You should see an output
tail -f /var/ossec/logs/alerts/alerts.log | grep suricata
- (Alternatively) Generate new logs and look in theUSM Appliance web UI for results:
-
- Go to Analysis > Security Events (SIEM).
- Under Datasource, select “AlienVault HIDS”.
- Click Grouped to view the events in groups.
-
Disable “logall”
Repeat all actions taken in Enable “logall” on USM Appliance, but this time delete the line “<logall>yes</logall>” from ossec.conf. This is to prevent the archives.logfile from growing too large.
These are actually wonderful ideas in about blogging. Salomi Isak Hedwiga